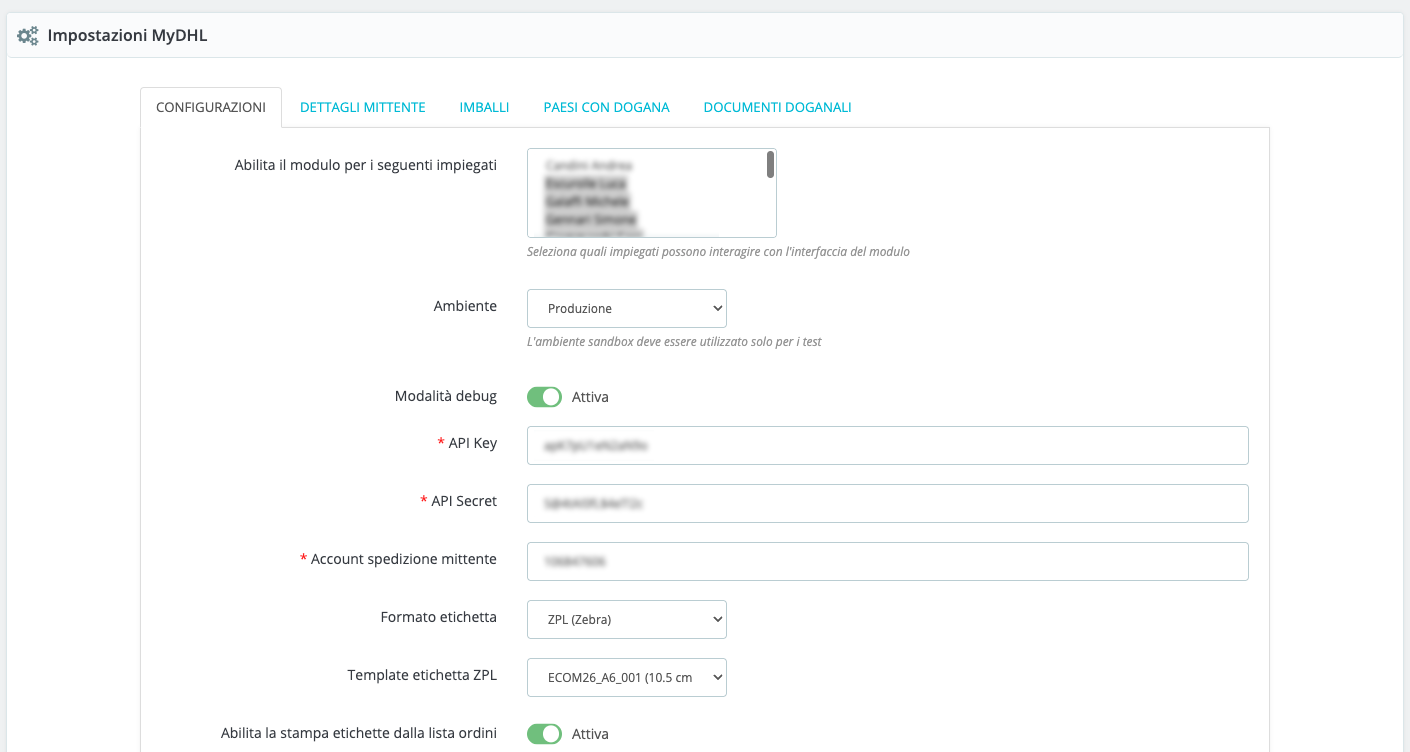
Within the MyDHL module configuration screen, you can set everything needed to make DHL shipments work correctly from your PrestaShop back office.
Remember that to use and configure the module, you need API credentials (API key and API secret). Check the appropriate section of the guide for more information.
Let’s go through each setting one by one and see what they mean and how to configure them properly.
👤
Choose which employees can use the module (i.e., create DHL labels and see the interface in the back office).
Select one or more users from the list of active back office employees.
🌍 Environment
You can choose whether to work in Sandbox mode (test) or Production mode (live).
-
Sandbox: useful for testing the module without actually shipping, it will show all features but generate test labels.
-
Production: real mode for shipping with DHL.
🐞 Debug Mode
Used to enable extended module logs, useful during development or to troubleshoot issues with technical support.
✔️ Enable it if something isn’t working and you need to understand what’s happening in the background; the module will generate daily logs of all communications with DHL in the /logs/ folder of the module.
❌ Keep it off in production if everything works normally.
🔐 DHL Credentials
-
API Key and API Secret: provided by your DHL account. Needed to connect PrestaShop to the service.
-
Sender account number: your DHL customer code.
⚠️ All three fields are mandatory for the module to work.
🧾 Label Format
Choose the format you want to download labels in:
-
PDF: standard, readable on all devices.
-
PNG: image of the label.
- ZPL (Zebra): for professional thermal printers.
If you select ZPL, other fields will appear (see below) to enable direct label printing to the Zebra printer.
For direct ZPL printing with the module, you need to install and properly configure Zebra Browser Print on the computer used for printing.
Zebra Browser Print is a desktop app by Zebra Technologies that lets the web browser communicate directly with Zebra printers connected to the computer, via USB or network. This allows instant ZPL label printing from the PrestaShop back office without downloading files or using external software.
To function properly, the module requires that the printer be correctly detected by Browser Print
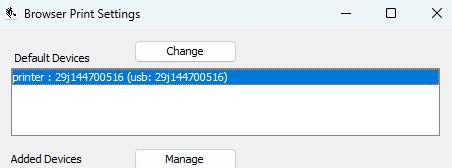
If multiple Zebra printers are connected, a popup will be shown the first time to select the desired printer. The selected printer will be remembered by the browser. To change it later, simply clear your browser cache.
🖨️ ZPL Label Template (only if using ZPL)
Choose your preferred layout for labels printed on a Zebra printer.
Each template has different dimensions. The default setting ECOM26_A6_001 uses labels sized 10.5 x 15 cm.
It’s important to ensure, during printing, that the generated label is complete and shows three barcodes at the bottom.
📦 Order list printing (only if using ZPL)
If enabled, you can print the label directly from the order list, without entering the order details.
This mode allows generation and printing of labels with one click, after selecting the package for the shipment.
Here you can configure:
-
CSS selector for label button in order list (CSS selector of the button)
-
CSS classes for label button in order list (CSS class of the button)
⚠️These options are for advanced users or for those needing to show the quick print button in third-party order list modules.
You don’t need to change default values if you use the standard PrestaShop order list.
-
DHL product code for order list printing (default DHL product code for these labels)
- Enable cash-on-delivery shipments printing from order list – If enabled, this option will block the automatic generation of COD labels from the order list.
Otherwise, if enabled and the order is paid with the “cashondelivery” module or has a status configured as COD-compatible, it will generate a COD label with the order total, with collection mode YYY (cash and POS).
📊 Shipments Dashboard
Lets you activate a summary dashboard of shipments directly in the back office (see dedicated documentation section)
📦 Preferred DHL Product Codes
Enter the DHL service codes you want to use, separated by commas (e.g., P,E,N) in priority order.
The module will always select the highest-priority service when creating a shipment within an order.
⚠️This option does NOT apply to order list printing, which allows only one product code selected in the “DHL product code for order list printing” configuration.
👉 Ask your DHL contact which codes to use if you’re unsure.
📝 Default Shipment Description
Will appear as the customs description if not specified elsewhere.
(e.g., “Motorcycle accessories” or “Electronic parts”)
🔢 HS Code and Country of Origin
-
Default customs code: 8-digit default customs code. Mandatory for exports outside the EU.
It can always be changed for each product when filling out the customs declaration in the order. -
Default ISO country code: 2-letter ISO country code (e.g.,
ITfor Italy), used if the product doesn’t have one.
📎 Automatic sending of PrestaShop invoice as customs document
If this option is enabled and an invoice PDF is available when generating the label,
the PrestaShop invoice will be automatically attached to the shipment as a “paperless” digital document.
📐 Save package dimensions to product
When enabled, if you ship an order with a single product without set dimensions, the module will use the selected package size to automatically update the product’s dimensions in PrestaShop.
🚚 Carrier to update after label creation
You can choose to assign a specific PrestaShop carrier after a shipping label is successfully generated.
📦 Custom order statuses
The module can automatically change the order status when the following events occur:
-
Label generated: Triggered after a successful label creation.
- Shipped: Triggered via cron or update tracking button, once the tracking is active on DHL’s side.
-
Delivered: Triggered via cron or update tracking button, when the shipment is marked as delivered.
For each event, you can prevent the status update by selecting “Do not change order status.”
-
Cash-on-delivery order statuses: select valid order statuses for COD. This allows automatic application of the order amount as COD to be collected.
💡Do not automatically advance order status if it is in these states
It may be useful to prevent automatic order status changes in certain cases (e.g., problematic or partial orders).
In this menu, you can select one or more statuses that will block any automatic status update by the module.
🛡️ Automatic order insurance
-
Leave blank = no insurance.
-
Enter
0= always active insurance. -
Or, enter an amount to insure only orders above that threshold (e.g.,
200).
🧑 Default employee
Select the default back office employee for the module (used for automatic/crons status changes).
✉️ Sender Details
In this section, you set the sender’s information, i.e., who physically ships the goods. These details are used by DHL to fill in the labels and for all customs communications.
Fill in all fields carefully:
-
Company name: your business name or trading name.
-
Full name: full name of the contact person (e.g., “Mario Rossi”).
-
Email: email to use for DHL notifications or contact.
-
Phone: a reachable number in case of issues (preferably mobile).
-
Address line 1 / 2: street, street number, building, apartment, etc.
-
Postal code: ZIP code of the shipping location.
-
City: sender’s city.
-
ISO country code: 2-letter international code (e.g.,
ITfor Italy,FRfor France). -
Company registration number: this may be your VAT number, EORI code, or any official customs reference required for exports.
👉 These details must match those registered with DHL for your customer code (Shipper Account Number), otherwise shipments may be rejected or blocked at customs.
📦 Packages
In this tab, you can configure all the box types you commonly use for shipments. It’s a convenient feature to avoid manually entering dimensions each time.
📋 How it works:
-
Enter a descriptive name for the package (e.g., “Small box”, “A4 box”, “60×40 carton”).
-
Specify the internal dimensions:
-
Length (cm)
-
Width (cm)
-
Height / depth (cm)
-
-
Check the “Default” option if you want this package to be selected by default during label creation.
🛠️ Available buttons:
-
Add package: to create a new row in the table.
-
Save packages: to confirm changes.
🌍 Countries with Customs
This section helps the module understand which countries require a customs declaration when creating a shipment.
When you enable a country in this list, you’re telling the module:
“Shipments to this country require a customs declaration.”
As a result, when you create a shipment to one of these countries, the customs section will automatically be displayed for you to complete (content, value, origin, etc.).
✅ How it works
-
Tick the countries where customs is needed (typically all non-EU countries).
-
For each enabled country, you can also set any ZIP code exclusion rules.
📌 ZIP exclusion rules
In some countries (e.g., Northern Ireland), not all areas require customs export. To exclude certain areas, you can use this field, which will bypass customs if the ZIP contains the entered characters.
🧠 Valid examples:
-
001excludes all ZIPs starting with 001 -
BTexcludes all ZIPs starting with BT
💡 If a postal code is among the excluded ones, the customs declaration won’t be shown even if the country is enabled.
💾 Saving
After selecting countries and setting ZIP rules, click “Save settings” at the bottom of the table.
📁 Customs Documents
This section lets you upload and manage custom PDFs (e.g., pro forma invoices, certificates, origin declarations) that can be automatically attached to international shipments.
📤 To upload a document:
-
Internal name: a label to help you identify the file (e.g., “Seller declaration”).
-
Document type: choose from the available options (used for API submission).
-
(Optional) Check “Automatically attach to customs shipments” if you want it attached to all customs shipments.
-
Select file: must be a PDF.
-
Click “Upload”.
The file will appear in the table below, where you can:
-
Download it
-
Delete it
-
See whether it’s marked as auto-attach
📌 Files uploaded here are reusable for all shipments, no need to upload them again. Ideal for those doing many extra-EU exports.